Whenever I think about cozy evenings, vanilla is the fragrance that immediately comes to mind. Its creamy sweetness has a way of making any space feel warm, inviting, and even a little nostalgic.
That’s why, after buying store-bought candles for years, I decided to try making vanilla-scented candles at home, and it turned out to be one of the most rewarding DIY projects I’ve done.
Not only do homemade candles let you control the quality of the wax and fragrance, but they also give you the freedom to adjust the strength of the scent, the size of the container, and even the decorative style.
In this guide, I’ll walk you through the step-by-step process I personally follow to create vanilla candles in my kitchen.
I’ll also share some lessons I learned along the way, like whether vanilla extract really works in candles and which wax holds scent best.
By the end, you’ll be able to confidently craft your own natural, long-lasting vanilla candles that smell every bit as good as the ones you find in stores.
What You Need to Make Vanilla Candles
Before you begin, it’s essential to gather all the right ingredients and tools. I’ve found that preparation makes the process much smoother and helps avoid mistakes once the wax is melted.
Here’s what I use:
- Wax – You can choose soy wax, beeswax, or paraffin. Personally, I love soy wax because it’s eco-friendly, has a clean burn, and holds fragrance oil well. Beeswax gives a subtle honey-like undertone, while paraffin is more affordable and creates a strong scent throw.
- Wicks – Cotton or wooden wicks both work, but make sure you size them correctly for your container so the candle burns evenly.
- Heat-safe containers or molds – Mason jars, ceramic cups, or candle tins are all excellent choices. I usually go for glass jars since they showcase the creamy white vanilla wax beautifully.
- Double boiler or melting pot – This is the safest way to melt wax evenly without overheating it.
- Fragrance option – This is where many beginners get confused, so let’s break it down:
When I first started making candles, I thought I could just pour some vanilla extract from my kitchen into melted wax—but it didn’t work as expected.
Here’s what I’ve learned from experimenting with different options:
- Vanilla fragrance oil: The best choice for candle making. These oils are designed to withstand heat and give a strong, consistent fragrance throw. If you want your candle to fill the room with a long-lasting vanilla aroma, this is the way to go.
- Vanilla extract: Yes, you can add it to candles, but the scent tends to fade quickly once the wax hardens. It’s more suitable for baking than candle crafting.
- Vanilla essence: Lighter and less stable than fragrance oils. In my tests, the aroma barely lingered after burning.
If you want professional-quality results, always use fragrance oil. However, if you’re just experimenting for fun, you can try extract or essence to see the difference yourself—it’s a good learning experience.
Steps to Make Vanilla-Scented Candles at Home
Once I gathered my materials, I realized the actual process of candle making is surprisingly simple—but precision is everything.
From wax temperature to wick placement, each detail affects how evenly the candle burns and how strong the vanilla aroma lingers in the air.
I’ll walk you through the same steps I use when making my own batches of vanilla candles at home.
If you’re wondering whether vanilla extract or essence works in candles, you’ll see exactly how and when to add them, and why fragrance oil still gives the best result.
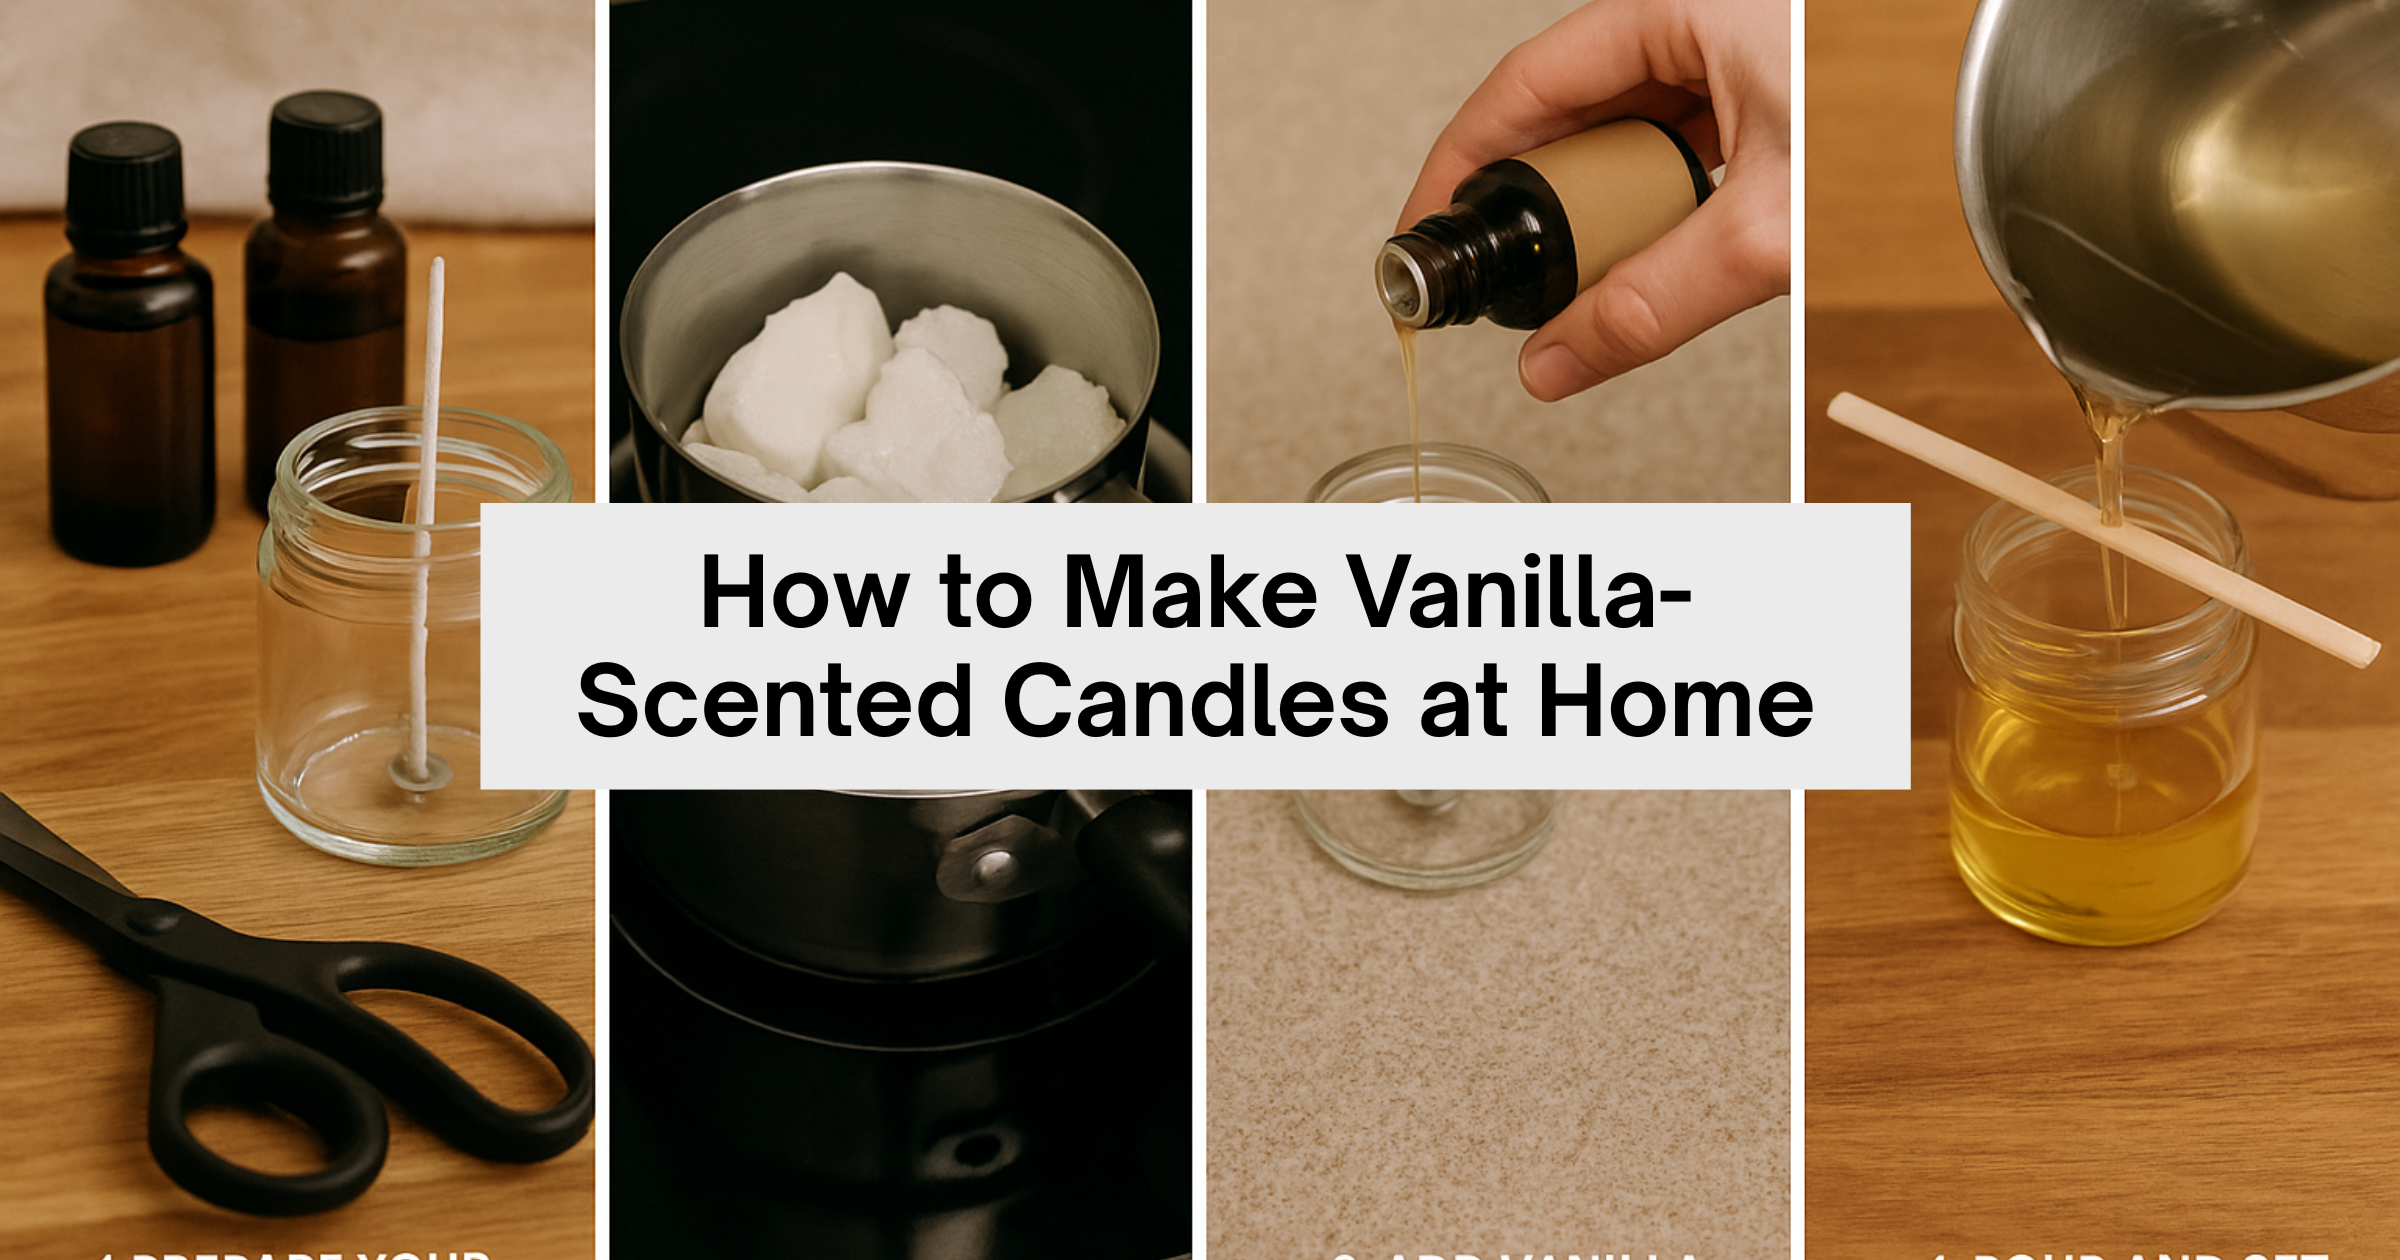
Step 1 – Prepare Your Materials and Workspace
Before I even turn on the stove, I set up everything on a clean, flat surface. I place my jars, secure the wicks with a wick holder or clothespin, and lay out the thermometer, spatula, and fragrance oil so I don’t scramble at the last minute.
A double boiler goes on the stove with water simmering gently—this ensures the wax melts slowly and evenly without burning.
I also make sure the room is well-ventilated, and I usually wear an apron because wax splatters are stubborn once they dry.
Don’t skip this step. A tidy, prepped workspace makes the whole process smoother and much less stressful, especially if you’re experimenting with vanilla extract or essence and want to avoid spills or rushed mistakes.

Step 2 – Melt the Wax
Next comes the most technical part: melting the wax. I usually work with soy wax because it’s eco-friendly and gives a clean burn, but sometimes I experiment with beeswax for a natural touch or paraffin when I want a stronger scent throw.
- Soy wax: Melts around 120–180°F (48–82°C)
- Paraffin wax: Requires slightly higher heat, closer to 170–185°F (77–85°C)
- Beeswax: Melts around 145°F (62°C)
I always keep a thermometer clipped to the pot. Overheating can damage the wax and cause the fragrance to evaporate before it even sets.
Patience here really pays off—melt slowly and evenly until the wax is completely liquid and smooth.

Step 3 – Add the Vanilla Scent
This is the stage that makes all the difference. The big question everyone asks is: Can you use vanilla extract or vanilla essence in candles? The short answer is yes, but with limitations.
Here’s what I’ve tested personally:
- Vanilla extract: Works, but the scent is subtle and tends to fade after curing.
- Vanilla essence: Even lighter and not very stable under heat.
- Vanilla fragrance oil: The clear winner. It holds up during burning, gives a stronger throw, and fills the room with that sweet, creamy aroma.
What I do is let the wax cool down slightly (usually around 130–140°F for soy) before adding the scent. This prevents the fragrance from evaporating.
Then I stir slowly for about two minutes to make sure the vanilla scent is evenly distributed.
If you want candles that truly make your space smell like a cozy vanilla bakery, invest in fragrance oils designed specifically for candle making.

Step 4 – Pour and Set the Candle
Now comes the part where everything comes together. With the wick centered and secured, I carefully pour the scented wax into my jars, leaving about half an inch at the top.
Pouring slowly prevents air bubbles and gives the candle a smoother finish.
- Soy wax: Needs at least 24–48 hours of curing time before lighting.
- Paraffin wax: Sets faster but still benefits from a full day of curing.
- Beeswax: Takes longer to set and harden, but produces a beautifully long-lasting candle.
I cover the jars with a light cloth while they cool to protect them from dust or drafts.
During curing, the vanilla aroma deepens and bonds with the wax, which means a stronger fragrance throw once the candle is lit.
One mistake I made early on was lighting candles too soon. Be patient—curing is like letting a good wine age. The longer you let the wax rest, the better the scent payoff.

Precautions When Making Vanilla Candles
When learning how to make vanilla-scented candles, it’s essential to prioritize safety. Choosing the right wick size ensures the candle burns cleanly without tunneling or smoking.
Controlling temperature is also important because adding scent when the wax is too hot can cause the fragrance to burn off.
Storage is another key factor. Keep finished candles in a cool, dark place to protect their aroma. Handle melted wax carefully, as it can cause burns if spilled.
By following these precautions, you can enjoy crafting without worry and get the best results when using vanilla extract for candles in your recipe.
Can You Use Vanilla Essence in Candles?
Many beginners wonder if vanilla essence will work in candle making. The short answer is yes, but it is not the most effective option.
Vanilla essence is weaker and less stable under heat, which can result in a candle with only a faint aroma. In comparison, vanilla extract for candles provides a slightly stronger scent, but still fades faster than fragrance oil.
If you ask, Can I use vanilla extract in candles, the answer is that you can, but for the best results, fragrance oils are the top choice.
That being said, essence can be a good way for beginners to experiment without much cost. It’s perfect for testing before investing in candle-specific oils.
Tips for Stronger Vanilla Scent in Candles
When figuring out how to make vanilla-scented candles, the biggest challenge is often fragrance strength. Vanilla is naturally soft, so getting a candle that truly fills the room takes a little extra care.
By applying a few tested methods, you can make sure every batch delivers a warm, noticeable aroma.
These tips work with both fragrance oil and vanilla extract for candles, though oils are more reliable.
1. Use the Right Fragrance Load
The amount of fragrance you add makes a huge difference. Candle waxes can usually hold between 6 to 10 percent fragrance oil based on the total wax weight.
If you use too little, the candle will barely smell when lit, but adding too much can cause sweating on the surface or an uneven burn.
Always weigh your wax and calculate the fragrance carefully. This small detail ensures your candle has the right balance between aroma and burn quality.
2. Allow Proper Curing Time
Freshly poured candles may look ready, but the fragrance inside has not fully settled. Curing allows the wax and scent to bind together, creating a stronger throw when burned.
For soy wax, three to five days is usually enough, while paraffin may only need one to two days.
If you use vanilla extract for candles, a longer curing time helps compensate for the lighter scent. Waiting may take patience, but it pays off with a richer fragrance experience.
3. Control Pouring Temperature
Temperature is another factor that affects scent strength. If fragrance is added when the wax is too hot, the aroma can evaporate before the candle even sets.
On the other hand, adding it when the wax is too cool can lead to poor mixing and uneven distribution. Most soy waxes work best when fragrance is added between 120°F and 135°F.
Keep a thermometer nearby and follow the range for your chosen wax. This ensures the vanilla scent remains strong and consistent.
4. Store Candles Correctly
Even the best candle can lose its aroma if stored poorly. Heat, sunlight, and open air all weaken the fragrance over time.
Once your candles are cured, keep them in airtight jars, wraps, or boxes. Store them in a cool, dark space away from direct light.
Proper storage not only preserves the vanilla aroma but also keeps the wax color stable. When cared for this way, homemade candles stay fresh for months and keep their scent throw strong.
Creative Vanilla Candle Variations
Once you learn how to make a vanilla candle, you can start experimenting with creative twists.
Vanilla is versatile and pairs beautifully with many scents, so you don’t have to stop at a single fragrance.
By trying different blends, designs, and seasonal touches, you can make candles that feel personal and unique.
These ideas will also inspire you if you want to craft a vanilla extract candle with a little extra flair.
1. Pairing Vanilla with Other Scents
Vanilla blends well with spices, florals, and citrus. For a cozy winter vibe, combine vanilla with cinnamon or nutmeg.
If you want a calming effect, mix it with lavender or chamomile. For something uplifting, pair vanilla with orange or lemon.
These blends add depth to the fragrance and create candles suited for different moods and occasions.
2. Designing Layered or Swirled Candles
Layered candles are made by pouring one scent and color, letting it set slightly, and then adding another. Vanilla works beautifully as a base layer because it complements so many fragrances.
You can also swirl two colors together for a marbled effect, giving your candles a handmade, artistic touch. These small design changes turn simple vanilla candles into eye-catching pieces.
3. Creating Seasonal Candle Themes
Vanilla is timeless, but adding seasonal ingredients makes it even more special. In autumn, mix vanilla with pumpkin spice or clove.
For spring, pair it with fresh herbs or floral oils. Summer candles shine with vanilla and coconut blends, while winter calls for peppermint and vanilla.
Each season brings a new way to enjoy the familiar warmth of vanilla.
Final Thoughts
Making vanilla candles at home is rewarding and surprisingly simple once you know the steps. By learning how to make vanilla-scented candles, you gain full control over the fragrance strength, wax type, and creative details.
From carefully measuring fragrance loads to allowing proper curing, each step contributes to a candle that burns evenly and smells delightful.
A homemade vanilla candle is more than just a craft; it’s a way to create a comforting atmosphere in your home.
Once you understand how to make a vanilla candle, you can also experiment with blends, colors, and seasonal themes.
The result is a candle that reflects your personal style while filling your space with a warm and welcoming aroma.
Frequently Asked Questions
Can I use vanilla extract in candles?
Yes, you can use vanilla extract in candles, but it often produces a lighter scent compared to fragrance oils. It works for small projects but may not last as long.
What type of wax works best for vanilla-scented candles?
Soy wax is eco-friendly and holds fragrance well, paraffin gives strong scent throw, and beeswax provides a natural honey undertone. Each works for vanilla extract for candles, but soy is the most common choice for beginners.
How long should homemade vanilla candles cure before use?
Curing for 3 to 7 days helps the fragrance bind with the wax. This makes the scent stronger when the candle burns.
Why does my vanilla candle have little to no scent when burning?
This often happens when too little fragrance is added or when it’s mixed at the wrong temperature. Always check the fragrance load and follow temperature guidelines.
Is vanilla essence safe for candle making compared to fragrance oils?
Yes, vanilla essence can be used, but fragrance oils are stronger and more heat-stable. Essence is better for small, beginner projects, while oils are recommended for consistent results.